Installing new cabinets can be a great way of giving the kitchen a fresh look without diving headfirst into a renovation. While this process is generally straightforward, it does require a lot of attention to detail. Since hiring help for home upgrades may not always be possible or affordable, here’s a handy guide to help you confidently plan for, prepare, measure, and install your new Lowe’s cabinets and upgrade your kitchen space.
Before ordering new cabinets for your kitchen, it is essential to know the exact specifications of your space. Measure everything in the kitchen, including the doors, windows, and molding. Use this as a guide to create a plan and order new cabinets. Be sure to include details regarding plumbing, gas, or electrical lines that run behind the cabinets as well.
After measuring, you can use the Lowe’s Kitchen Designer tool to determine how many cabinets you will need. If you’re unsure about this process, you can also seek expert advice from a Lowe’s Kitchen Design Specialist via a free virtual consultation.
Removing the existing cabinetry
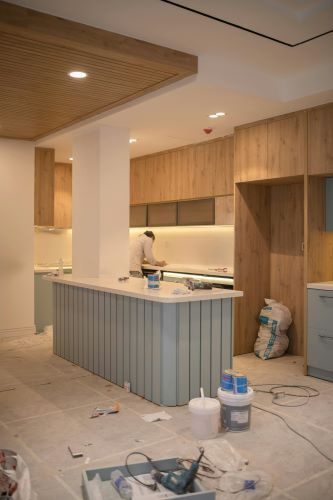
During renovation, you must first remove the existing cabinets so that new ones can be installed. But before starting, turn off the gas, plumbing, or electrical supply lines running through the kitchen. Remove all the doors and drawers on the cabinets, along with the appliances. The sink, countertop, and molding may also need to be removed. Once this is done, carefully remove the screws from the back of the frame and gently take the cabinets off. Ask for help during this process, especially when removing upper cabinets.
Preparing for new cabinet installation
Once the old cabinets have been removed, it is important to repair any holes and smooth out the walls. Also, if there are other renovations to be carried out, now would be a good time to complete them and add some fresh paint to the area.
Marking the depth and height: Once the basics are covered, it is time to place the cabinets. Start by marking the depth and height of the cabinet bases on the floor and along the work area.
Marking the studs: Similarly, mark the studs for the upper cabinets. This layout will help ease the installation process.
Whether you’re installing shaker kitchen cabinets or contemporary kitchen cabinets from brands like Lowe’s, RTA, or others, these preparatory steps will remain the same.
Installing the upper cabinets
Once all the guidelines have been prepped and marked, it is time to install the cabinets. Here’s a simple breakdown of the process:
Start by attaching the ledger on the wall.
Measure the cabinets again, starting from a corner hanging cabinet.
Once done, drill the cabinets at the top, middle, and bottom rails. Repeat this step for all the units.
Mount the hanging cabinets. Avoid over-tightening the screws here, as it could impact the overall finish.
Drill and connect the upper cabinets as well, using a drill with a countersink/taper twist drill bit.
Fill in any gaps using cabinet fill strips.
Once the cabinets have been connected, tighten the rear screws and remove the clamps and ledger boards.
To finish, install the ledger molding and the upper cabinets are done.
Installing the base cabinets
Once the upper cabinets have been installed, it’s time to move on to the base. Here are the steps for the same:
Just like the upper cabinets, start by placing the corner cabinet. Drill holes and set this in place, in line with the other markings. Repeat this process for the second cabinet as well.
Drill more pilot holes through the face frames to connect the cabinets. Continue doing this until you reach the sink frame.
In the sink base, cut the holes for plumbing and install as usual.
Depending on your chosen installation technique, you may also need to shim under the base.
Similarly, install all the other cabinets. Once you reach the last cabinet, you may be left with a little space. There’s nothing to worry about, as this can easily be filled using the filler strip.
Attach the filler strip and tighten all the screws. Remove any clamps.
Lastly, attach the toe kicks using finish nails to complete the process.
Once the cabinets have been installed, it is time to adjust the hinges to ensure they look aligned. This can be done by using a simple screwdriver. In some cases, the handles may also need to be installed separately.
If you’re not keen on taking on the renovation project yourself, you can also rely on Lowe’s cabinet installation experts. By requesting a free consultation, you will gain access to all their service options, where you can plan the project and have the cabinets installed professionally as per your needs.
The Editorial Team at Modern60 is a group of highly skilled professionals with diverse backgrounds in journalism, content creation, editing, and digital media. They bring a wealth of experience and expertise to ensure that every piece of content meets our strict editorial guidelines and quality standards. The team is dedicated to delivering accurate, well-researched, and engaging content across various subjects, including health, wellness, lifestyle, and current events. With their commitment to upholding the highest standards of journalism and content creation, the Modern60 Editorial Team is the driving force behind our mission to empower and inspire our readers.
We use cookies to collect and analyse information on site performance and usage and to enhance and customise content and advertisements. By clicking Accept or by clicking on any content on this site, you agree to allow cookies to be placed. Click on our Privacy Policy page to understand what kind of data we collect and what we use it for.Accept


There are no comments yet